Importing Data
UniPlot supports data import of the following file formats:
Adapt Format, Test Bench Files, MTS Powertrain Technology Division (http://www.mtspt.com)
ASAM-ODS (Browser for API 3 ASAM-ODS Browser (RPC) and API 4 ASAM-ODS Browser (CORBA))
BLF (CAN), see Import of CAN Files.
CAS, Combustion Anaylzing System of MTS Powertrain Technology Division and FEV Motorentechnik GmbH, Germany
COMBI, Combustion Anaylzing System of SMETec GmbH, Germany
CONVERGE data files (
*.out,*.in,*.echo). CONVERGE is the CFD solver from Convergent Science (https://convergecfd.com/), see Import of CONVERGE files.D7D(
*.rec), Dewesoft (http://www.dewesoft.com/) see The D7D Import FilterdBase-Format
DIAdem data files (
*.dat), see Import of DIAdem files.DIAdem TDM- and TDMS files, see Import/Export of TDM Files.
Excel (Version 2.1 to Excel 2016)
ERG(
*.rec), Siemens CATS Flexible, see The ERG Import FilterFAMOS imc Messsysteme GmbH, (http://www.imc-berlin.de), see Import of FAMOS files.
FEVIS, Combustion Anaylzing System of enorise GmbH (https://www.enorise.com/), Germany, see Import of Fevis Files.
FLEXLAB Browser for API 1 (Discover it <https://www.enorise.com/flex-lab-data-management-test-cell-test-benches _). See :ref:`import-of-flexlab-data.
IFILE, Combustion Anaylzing System file format of AVL List GmbH, Graz-Austria, see Import of IFILE Data Files.
Lotus-Format
MATLAB-Format 4 and 5, see Import of MATLAB Data Files.
MDF format (some systems which use the MDF file format to store data are: VS100/INCA of ETAS GmbH, Germany, Drive-Recorder of IAV GmbH, Germany, and CANalyzer of Vector Informatik GmbH, Germany, see Import of MDF Files)
MDF4, see Import of MDF4 Files.
MORPHEE test result data (Discover it). See Import of MORPHEE files.
netCDF file
Puma 5.4, Test Bench Format, AVL List GmbH, Graz-Austria
Import of MDF-Stiegele Files (Stiegele Datensysteme GmbH und Caesar Datensystem GmbH)
REC DAS700(
*.rec), Sefram (https://www.sefram.com/), see Import of REC DAS700.SIMULINK, integrated result export via the Sequencer and MATLAB app. See Simulink Connector.
Tektronix Waveform Format (
*.isf)Text format (ASCII files or CSV files, DSV files)
UTX-Format (UniPlot Text File format), see UTX Data File Format.
Virtual Dynamics request files, see Import of Virtual Dynamics Request files.
WFT, Waveform File of Nicolet Instruments
XONE, Test Bench Format, Schenck Pegasus GmbH
UniPlot now also support calibration data import :
DCM file, see Import of Calibration Data Files
PACO, see Import of Calibration Data Files
If a filter is not loaded into UniPlot choose Tools=>Add-In Manager to install the filter. Not all of the above filters are installed with the UniPlot setup program. If you do not find the filter please contact us.
Company-specific binary and text formatted files can be imported using the built in programming interface.
Load a dataset
The import process is completed in two steps:
Load, convert and save the data in a netCDF file.
Load the data from the netCDF file, create a dataset and attach it to a diagram.
The first step is only necessary to import the first dataset. It can take anywhere from seconds to several minutes to convert a Text, Excel, or a data file in another format depending on the number of data points in the file. If the data file has multiple columns, they can be directly imported from the netCDF file. The netCDF file will be stored in the directory of the Text or the Excel file under the same name, but with an
.NCfilename extension.To import data from a Text or Excel file
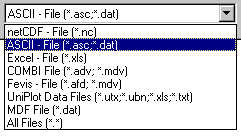
Choose File=>Import Data.
In the File Open dialog box, select the type of file. Select the name of the data file and click OK.
UniPlot loads the file and creates the netCDF file. If a netCDF file with the same name already exists, you will be asked if you would like to overwrite the file or save it under a different name.
If the creation of the netCDF was successful, the following dialog box appears:
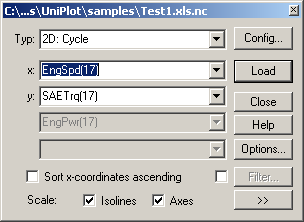
In this dialog box, you can specify the dataset you want to import.
1D, 2D, 3D
Specify the dataset type you want to load.
x, y, z Column
To import the dataset, each axis must be assigned a data column. If the data columns have names above the data and their position was defined correctly in the Import Options dialog box, the combo boxes will display the names. Otherwise, the columns will be enumerated (Col1, Col2,…).
Scale Isoline Values
If the Isoline check box is selected, isolines will be created for a 3D dataset. The isoline values are chosen to allow them to be spread as evenly as possible over the map.
Scale Axes
If this check box is selected, the diagram axes will be scaled automatically.
Excerpt from an Text Data File:
RPM     Torque  Torque2 bsfc    ... Power   PME
1/min   Nm      Nm      g/kWh   ... kW      bar
1249    55.70   53.51   934.1   ... 7.27    7.05
1243    48.97   47.14   933.2   ... 6.14    6.19
.
.
.
6730    24.27   23.38   239.1   ... 17.68   3.07
6763    15.66   15.09   157.7   ... 11.71   1.98
6740    8.04    7.75    123.6   ... 5.99    1.02
The first row of the file contains the names of the data columns. The names are placed two rows before the first data row. In order to display variable names, choose 2 for the column title position in the Import Options dialog box.
To create a fuel consumption map from the data excerpt above, choose the 3D
radio button. Select the N data column for the x-axis, MEFF for the
y-axis and BEEWG for the z-axis. Choose the Load button to import the
data into the selected diagram.
Important: In previous UniPlot versions, the Full Load Line (WOT) definition had to be placed in the first data column. In UniPlot 2.0 and further versions, the definition must be located in the last column.
Format Description for CSV, Text and Excel Files
When using CSV (Comma-Separated Values), Text and Excel files, the following format description must be paid attention to:
The data must be arranged in columns. The first data row must be occur in the first 256 rows.
Number of Columns: The maximum number of columns is limited to 8000.
Number of Rows: The maximum number of data rows is only limited by the amount of available memory. For a 1D or 2D dataset, at least 1 data row is required. A 3D dataset requires 5 data rows.
Column Separator: The import filter accepts the following column separators:
Column Separator |
Description |
|---|---|
|
Semi-colon |
|
Tab character |
|
comma |
|
one or more white spaces |
The import filter searches for the column separater in the last 4 rows of the first 256 rows. The separator which occurs most is used. If the separator is a comma the decimal sign must be a period (.). The white space is only used if no other separator is found.
Decimal Separator: Valid decimal separators are the period (.) and a comma (,). The decimal separator is found automatically.
Channel and Unit Names: The file may contain one row with column names
(channel names) and one row with unit names. The column names
must appear above the unit names. If 80 % of all names are unique, only then will
the import filter use them as channel names. If the filter
does not find the channel names, the channel name will be created from the
name Col followed by the index of the column. If a name occurs more than once,
the names are enumerated to create unique names.
Column Type: The data is saved in the NC file as real4 (float) values.
If the column contains no valid real or integer values, the complete
column will be saved as a text channel. If the fields contain valid date or time
values e.g. 2007-01-17, the column will be saved as date or time values
(datatype = date or datatype = datetime or datatype = time).
Missing Values: Empty fields or fields containing one of more of the following characters “*”, “-”, “#” will be saved as missing_values. Fields with the following values will also be saved as missing values (case is ignored): “not a number”, “nan”, “1.#inf”, “no value”, “missing*”. “#” in the first column will set all values in the row to missing.
Comment Lines: The rows above the data columns may contain comments These rows will be skipped automatically during import.
Double Quotes (“”): Fields may always be delimited with double quotes. The delimiters will always be discarded. Numbers in double quotes will be treated as text.
The following example shows a valid file in text format.
Speed   Torque  Power
1/min   Nm      kW
1249    55.70   53.51
1243    48.97   47.14
3567    38.54   27.14
6763    15.66   15.09
6740    8.04    7.75
All data rows should contain the same number of fields (columns). In the
following data file, the 5th row contains only three numbers.
The third value of the Power channel will be saved as “missing” in the NC
file.
Speed; Torque; Power; B
rpm; Nm;  kW;  -
1249; 55.70; 53.51;   7.27
1243; 48.97; 47.14;   6.14
6730; 24.27;      ; 239.1
6763; 15.66; 12.03;  15.09
6740; 8.04 ;  7.75;   5.99
The following file is a valid CSV file with a date and time column. Text fields are delimited with double quotes. The spaces in the channel names are replaced by underscores in the NC file.
"Date","Time","Rate","Num Average","Operator ID","State Label","Sample Label","Engine_upl"
,,V,,,,,""
"27/04/2006","09:59:13.150",1.000000000000000000,1.0,,,,"Otto, Diesel",
"27/04/2006","09:59:13.250",2.000000000000000000,1.1,,,,"Otto",
"27/04/2006","09:59:13.350",3.000000000000000000,1.2,,,,"Otto",
"27/04/2006","09:59:13.450",4.000000000000000000,1.3,,,,"Otto",
UTX Data File Format
The following chapter will describe an easy to create and easy to read file format for UniPlot (UTX Format).
Pros
Easy to create with all programming languages.
The file can be created and edited manually with a text editor or spread sheet program.
Files that are already organized in column form can easily transformed into this format.
Cons
All channels (columns) must have the same number of data points.
Format Decription
The file consist of two sections, the description block (header) and the data block.
The file starts with the description block. This block begins with the keyword
UXX-BEGIN (case will be ignored) and ends with the keyword UXX-END.
The description block is followed by the data block. This section consists of the data organized in columns in text form (ASCII).
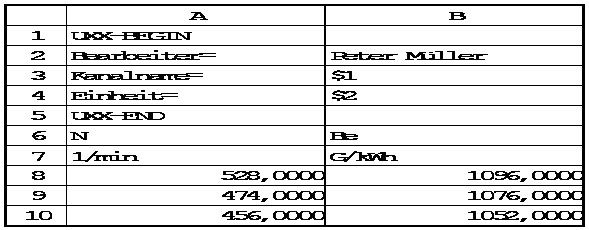
Example 1: The following example file contains two channels: The channel
Speed [rpm] in the first column and channel the Torq (Brake Torque) in
the second column. The columns are separated by a tab sign.
The description section contains three attributes: Operator, Channelname
and unit. Channelname and unit are so called channel attributes, i.e.
for every channel in the file the attribute holds one value. The value $1 for
the channel name defines that the channel names are found one line after the
description block. Channelname has the two values Speed and Torq and
the attribute unit holds the values rpm and Nm. The attribute
Operator is a global attribute with the value "Peter Miller".
UXX-BEGIN
Operator = Peter Miller
Channelname =  $1
unit = $2
UXX-END
Speed       Torq
rpm         Nm
528,000     96,00
474,000     76,00
456,000     52,00
Example 2: UniPlot can also read the file if it was created with the spread
sheet program Excel and saved as an Excel file (all formats inclusive Excel
2007). In this case the keyword UXX-BEGIN should be in cell A1, the
attribute name should be located in first column and the attribute value in the
second column.
Example 3: Data arranged in rows can be imported. In this case the attribute
uxx-transposed = 1 must be specified.
UXX-BEGIN
columnseparator = " "
Operator = Peter Miller
Channelname =  $1
unit = $2
uxx-transposed = 1
UXX-END
Speed    1/min   528,000  474,300  456,000
Torq     Nm       96,00    76,00    52,00
The Description Block
The description block holds the global attributes (with a scope for the hole file) and the channel attributes.
Global Attribute
A globale attribute has the same syntax as an assignment:
NAME = VALUE
or
NAME = VALUE-LIST
The attribute name NAME can be a string of up 40 characters. It can start
with an underscore "_" or a character followed by up to 39 characters,
underscores of digits. Special characters should not be used for attribute names
(they will be replaced by underscores). The character sequences UXX-BEGIN
and UXX-END are invalid names. VALUE can be an number (integer), a real
number or a character string.
Integer
An integer is a number of the form 123 or -123. If the number contains an decimal separator it will be saved as a real number. E.g. 1.23e2 (= 123) will be saved as a real.
Real
A real is a number of the form 12.3e1, 123. or 123.0. The decimal separator is a dot or a comma.
String
If the attribute value is neither an integer or a real number it will be saved as a string value. The ANSI character set should be used for strings (see table in the appendix).
Example:
Date=      12.06.1998
Engine=      12AT29
Strings can be enclosed in double quotes.
VALUE-LIST is a sequence of values of one data type (integer, real or
string), which are separated by separator sign (default is a tab character).
Example:
Parameter= 12  24  22,5
Range= 1  24576
Channel attributes
The values for the channel attributes are organized as a list enclosed in square brackets [ ]. They are separated by the separator sign (default is a tab character).
NAME = [VALUE VALUE VALUE]
The list must contain a value for each channel. The order must be identical to the column order in the data block. All values must have the same data type, i.e. numbers and strings should not be mixed.
Instead of assinging a list of values in the form:
NAME = [ VALUE-LIST ]
the channel attribute can be specified in the following form:
NAME = $rownumber
In this case the attribute value can be found in row rownumber after the
keyword UXX-END. This makes it easier to edit the data with a spread sheet
program.
Continuation Line
The attribute list can be written over multiple lines. Te continution character
"&" at the end will indicate if the list will be continued in the next line.
The "&" character should only appear on the left side of the equal sign
(=) at the end of the line.
Example:
Channelname = [Speed  &
               Torq  &
               BHP]
is the same as
Channelname = [Speed Torq BHP]
Continuation lines are only valid in the description block and not in the data block.
Comments
A comment is a sequence of characters beginning with # in the
first column. With UniPlot 5.12.0 a data row can be marked as a comment row
by inserting the character "#" at the beginning of the row.
The values in a comment row will be saved in the NC file as missing_values.
The Data Block
The data block is a text block in ASCII format with an unlimited number of rows and up to 8000 columns.
The default column separator is one tab character. If a different
column separator should be used it must be specified in the
description block, e.g. Columnseparator = ";".
Continuation lines and comments are not allowed inside the data block. Empty lines will be ignored.
Channels with Date/Time data can be specified in the form
"25.01.1996 8:30:00", "25.01.1996" (only date) or "8:30:00" (only
time).
The standard attributes
The following standard attribute names are reserved and have a defined meaning:
Global Attributs
Columnseparator |
Scheme |
uxx-transposed |
Channel Attributes
Channelname |
Unit |
Datatype |
The standard attributes are not case sensitive, i.e. Datatype, datatype, DATATYPE are the same attribute.
uxx-transposed
If the data is arranged in rows instead of columns the file must contain the
attribute uxx-transposed = 1. If the data is arranged in columns the
attribute is optional.
Channelname
This attribute is mandatory.
The rules for channel names are the same as for attribute names. The
channel names can be a string of up 40 characters. It can start with
an underscore "_" or a character followed by up to 39 characters,
underscores of digits. Special characters should not be used for
attribute names (they will be replaced by underscores). The character
sequences UXX-BEGIN and UXX-END are invalid names.
Channelname= [Speed Tory BHP]
Instead of the this form you can specify the channelnames as following:
Channelname = $rownumber
In this case the channelnames can be found in row
rownumber after the keyword UXX-END. This makes it
easier to edit the data with a spread sheet program.
If the channel names are given in the form Name [unit]
and no other units are specified the name will be split
into channel name and unit. Example: Torq [Nm] will be split in
the channel name Torq and the unit Nm.
With the following command the splitting can be disabled. Type the command into the command window:
WriteProfileInt("Settings", "UTX_Split_Name_Unit", 0)
Columnseparator
The column separator separates the contents of cells within a row. The
default column separator is one tab character. If a different column
separator should be used it must be specified in the description
block, e.g. Columnseparator = ";". The following separtors are
supported:
Character |
Description |
|---|---|
|
(Default value) A single tab character (backslash + t) |
|
Multiple spaces and tab characters |
|
A single space (backslash + b) |
|
a semi-colon |
|
a comma |
|
a single character |
Columnseparator= ";"
Unit
Unit of a channel.
Example:
Unit = [rpm Nm g/kWh]
or
Unit = $rownumber
Datatype
The Datatype attribute specifies the channel data type. If the
attribute is not specified all channels will be saved as "real4".
The following data types are valid:
Datatype |
Description |
|---|---|
int1 |
One byte integer signed |
uint1 |
One byte integer unsigned |
int2 |
Two byte integer signed |
uint2 |
Two byte integer unsigned |
int4 |
Four byte integer signed |
uint4 |
Four byte integer unsigned |
real4 |
Floating-point numbers (4 Bytes) |
real8 |
Double precision floating-point numbers (8 Bytes) |
stringNNN |
character strings with length definition. NNN stand for an integer in the range 1 to 255, e.g. string80 |
date |
Date (8 Bytes) |
time |
Time (8 Bytes) |
datetime |
Date and time (8 Bytes) |
Datentyp= [date real4 string12]
The list must not contain a datatype value for every column. If
the number of elements is smaller than the number of channels, the
datatype is set to "real".
Scheme
Scheme is a character string created from the company name and/or the program name which created the file as well as a version number.
Example: (Company FVM, Test Cell Software P13, Version 1)
Scheme= FVM P13-1
Creating an UTX data file
To store your data in the utx format
create a file with the file name extension
.UTXor alternatively.TXT.Write into the first line the keyword UXX-BEGIN followed by new line separator (i.e. 0x0d and 0x0a or
\r\n).(Optional) Add one or more comments to the file.
Write the global attribute Scheme, e.g.:
Scheme= "AKT-W15"Write your global attributes, e.g.:
Operator= "Mr. Miller"
TC_Compressor= TA03-08F
Barom= "1013 mbar"
MinMax= 0  236.0
Write the channel attributes
"Channelname","Unit"and"Datatype":Channelname= $1 Unit= $2 Datatype= $3
Write your own channel attributes.
Write the keyword
UXX-ENDfollowed by new line separator (i.e. 0x0d and 0x0a or\r\n).Write the channelnames (separated by a tab character):
Time      Speed   Torq    bsfc
hh:mm:ss  rpm     Nm      g/kWh
time      real8   real8   real8
Write the channel data (separated by a tab character):
12:02:53 1000.2   32.23   267.6
12:03:47 1501.8   42.45   284.5
12:05:12 2004.2   48.44   296.3
Import of simple TEXT files using the UTX-Filter.
The data matrix for the simple Text-Import-Filter must be complete.
If values are missing, for example are marked as ** the import
will fail.
With the help of the UTX filter it is relativly simple to write an import filter with UniScript. Here is an UniScript example for the following text file:
Speed   Torque  Beewg  NOx
1/min   Nm      g/kWh  ppm
1000,2   32,23   267,6 990
1501,8   42,45   **    1100
2004,2   48,44   296,3 1200
UniScript:
ADDIN_AddToUI(ADDIN_FILE_IMPORT, "Test Cell File (*.ascii)|*.ascii|", ..
                                 "_My_Import");
// Check if the filename ends with .ascii
def IsFileMyImport_ASCII(ssFileName)
{
    if (strlower(SplitPath(ssFileName)[4]) == ".ascii") {
        return TRUE;
    }
    return FALSE;
}
// Returns the UTX header
def _My_GetHeader()
{
    ssHeader = "[[UXX-BEGIN
              Creator= Test Cell ASCII FILTER
              Channelname =  $1
              unit = $2
              UXX-END
            ]]";
    return ssHeader;
}
def _My_Import(ssFileName)
{
    if (IsFileMyImport_ASCII(ssFileName) == FALSE) {
        // File name extension is not .ascii
        return "";
    }
    if (IsFunctionLoaded("UXX_Import") == FALSE) {
        MessageBoxError("Cannot import file because the UTX-Filter is " + ..
                    "not loaded.\n" + ..
                    "Choose Tools=Addin-Manager an mark the Addin UTX-Filter.");
        return "#IMPORTERROR#";
    }
    // Writes the header to a temp file.
    // The temp file will be deleted at the end of the function.
    ssHeader = _My_GetHeader();
    ssTempFile = GetTempFileName();
    fp = fopen(ssTempFile, "wt");
    if (fp == 0) {
        return "#IMPORTERROR#";
    }
    fwrite(fp, "char", ssHeader);
    fclose(fp);
    // Call the UTX-Filter:
    ssRet = UXX_Import([ssFileName, ssTempFile]);
    // Delete temp file:
    DeleteFile(ssTempFile);
    return ssRet;
}
The example uses the UTX-Filter to import the test data. The UTX filter function UXX_Import()is invoked with two file names. The two file names are passed as a string vector. The first element is the file name of the data file and the second element is the file name of the header file.
In our example the header is specified in the _My_GetHeader() function. The header is saved in a temp file.
The header specifies the position of the channel names und units.
The program code can be saved in an ic file in the UniPlot-autoload directory.
The file must have the extension .ic, for example my_import.ic.
During the startup of UniPlot all ic files in the autoload directory will
be loaded.
Import 3D Matrix Data
To import a matrix with z-values from a Text or Excel file:
Choose Data=>More Data Functions.
Select the Load Matrix function from the list box and then choose OK.
In the File Open dialog box, select the type of data file. Select the name of the data file and then click the OK button.
If the file contains a valid data matrix, a dialog box will be displayed specifying the coordinates of the corner points.
The number of data rows and columns must lie between 2 and 1000. The number of columns and rows do not have to be equal.
Definition of the Full Load Line (WOT)
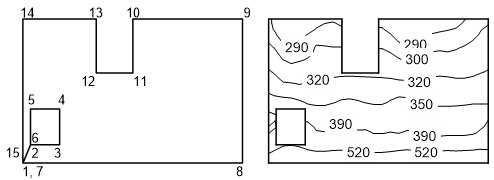
Finding the Data Hull
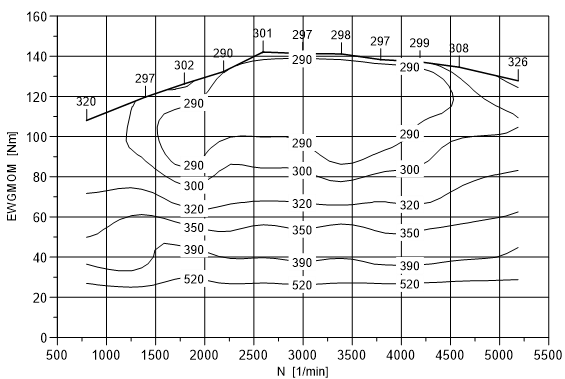
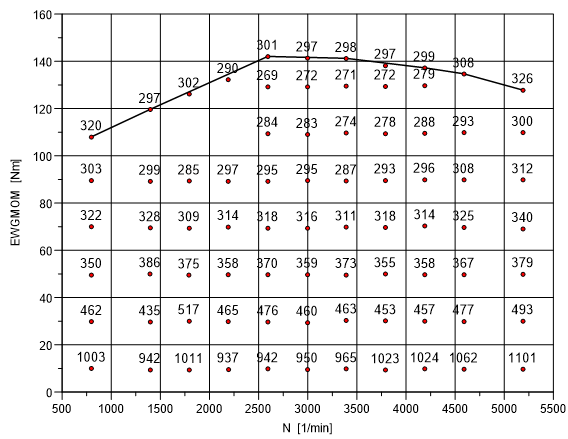
UniPlot offers a function to find the data hull of data points measured as map cross sections (as shown in the following diagram). The function finds the maximum and minimum points of each cross section band.
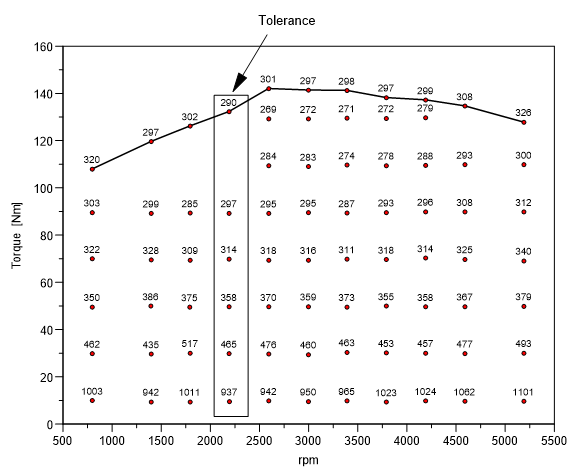
The x-values of one cross section must lie inside a tolerance band as shown in the diagram. The width of the tolerance band can be specified in the Find Data Hull dialog box. The maximum and minimum points of each cross section are connected to form the hull. A choice of 3 hulls is available.
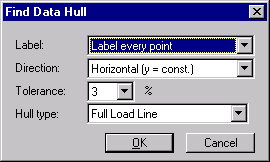
To execute the function, select the dataset and choose Data=>More Data Functions. Choose Find Data Hull (Full Load Line) from the list to open the following dialog box:
Select the appropriate options and click OK to execute the function. The new hull will be inserted into the dataset and saved as a User Hull.
UniPlot computes a convex hull curve during the import of a 3D dataset. The Full Load Line is the “north” part of the data hull. This convex curve may exclude some of the Full Load Line points. To plot the line correctly, the data file must be edited by entering characters in the last column to mark the Full Load Line’s data points. To edit a text (ASCII) data file, use an editor or spreadsheet program.
The following characters can be used to define a data hull:
A: Start point on the Full Load Line.
The point must belong to the automatically calculated “north” part of the convex hull and must have a smaller x-coordinate than the end point, E.
V: Full Load Line Point.
E: End point of the Full Load Line.
The point must belong to the automatically calculated “north” part of the convex hull and must have a greater x-coordinate than the start point, A.
If the symbols are entered as lower case letters (a, v, e), the corresponding data points of the Full Load Line (WOT) will not be labeled. However, use the lower case letters when you want to avoid label overlap. This can occur when the data points on the curve lie close together.
Procedure Hints
To create the Full Load Line:
Import the 3D dataset into UniPlot.
Open the 3D dataset dialog box, choose the Data Point Symbols dialog page and select the Scatter Plot and the Show z-Values check boxes. In the Hull dialog page, choose the Entire Hull hull type and then choose OK.
Load the data file to a program in which you can edit. For a text file you can use a UniPlot editor (Choose the Open button from the toolbar and select the file name). This is what you will see:
As you see, the data points with the z-values 320, 297, 301, 298, 299, 308, 326 were computed as the Full Load Line.
With the help of the scatter plot and the Full Load Line you can easily determine the true Full Load Line. Mark, as described above, the start point, end point and all other Full Load Line points. In the following figure, the data row with the z-value, 320, is marked as the start point (A). The data rows containing the 297, 302, 290, 301, 297, 298, 297, 299, 308 z-values are marked with a V. The row with the z-value 326 is marked as the end point of the Full Load Line (E).
Save the changes, close the data file and import the dataset again.
Arbitrary Data Hull
UniPlot makes it possible to load an arbitrary data hull, which can also contain islands, into a 3D dataset.
Only isolines within the data hull of the contour map will be plotted. Only surface facets of the 3D Plot lying completely inside the hull will be plotted.
The data hull must be a three columned ASCII File. The first and second column contain the x- and y-coordinates and the third column contains a control letter. Hull coordinates must be entered as world coordinates e.g. the same coordinate system as the 3D data points.
The following 4 letters must be used as control letters:
- m
m is the short form of Move To. The letter can be used to reach islands without inserting a connecting line.
- M
M has the same meaning as m, though the point will be labeled by the z-value of the contour map at this position.
- l
l is the short for Line To. This letter ensures that a visible line is drawn.
- L
L has the same meaning as l, but the point will be labeled by the z-value of the contour map at this position.
Example:
In the following table is the hull’s ASCII file. The numbers in brackets relate to the numbers in the figure. They should not be entered into the hull file.
1500    20  m   (1)
1600    30  m   (2)
2000    30  l   (3)
2000    50  l   (4)
1600    50  l   (5)
1600    30  l   (6)
1500    20  m   (7)
4500    20  l   (8)
4500    100 l   (9)
3000    100 l   (10)
3000    70  l   (11)
2500    70  l   (12)
2500    100 l   (13)
1500    100 l   (14)
1500    20  l   (15)
Save Hull
To save a 3D dataset hull, select the dataset and then choose File=>More File Functions. Select the Save Hull option and then click OK. In the SaveAs dialog box that appears, choose the name of the data file in which you want to save the hull and click OK.
Load Hull
To load a data hull into a 3D dataset, select the dataset and then choose File=>More File Functions. Select the Load Hull option and then choose OK. In the File Open dialog box that appears, choose the hull data file and click OK.
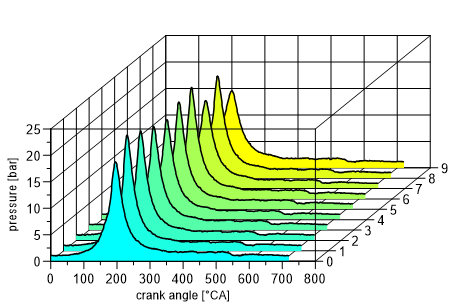
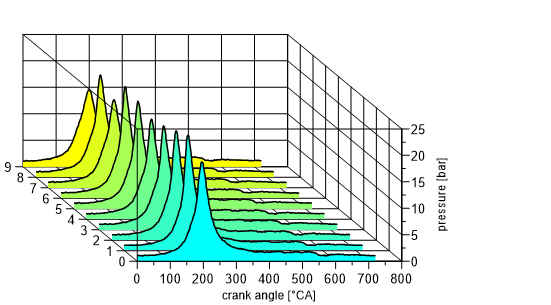
Waterfall Data Import
In a waterfall diagram, datasets are stacked into the depth of the diagram.
Data can be imported into a waterfall diagram in the same way as they are imported into a 2D diagram.
Two addional import data functions are available:
Import of cycles from a single channel This function splits perodical data into cycles. (File=>More File Functions=>Waterfall-Single Cycle Import)
Import of multiple channels This function imports data from multiple channels. One channel can be defined as an x-axis channel. A dataset is created for each selected channel. (File=>More File Functions=>Waterfall-Multi Channel Import).
Import of cycles from a single channel
This function splits perodical data into cycles.
To import the data:
Choose File=>More File Functions.
Select the list item Waterfall-Single Cycle Import.
Select a data file from the File Open dialog box.
If the file was read successfully, a dialog box with the channel names will appear:
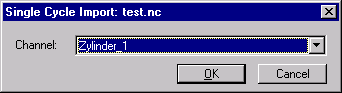
Choose a channel and click the OK button.
In the following dialog box you can specify the cycle you would like to import:
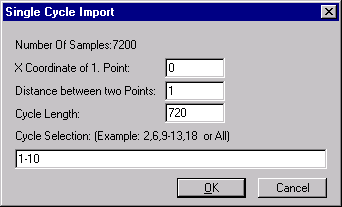
In this example, the cycles 1 to 10 were imported with a Cycle Length of 720 degrees CA. A crank angle of 0 grad CA was set for the 1st data point and 1 degree CA as step width.
If the diagram is not switched to the waterfall diagram, click
the Waterfall  button. To scale the
diagram axes, click the Zoom Out
button. To scale the
diagram axes, click the Zoom Out  button.
To change the orientation of the waterfall diagram, position the cursor in the yellow handle of the upper right corner and drag the corner to the desired position. Color filling of curves can be adjusted with the function Data=>More Data Functions=>Waterfall Data Configuration.
Import of multiple channels
This function imports data from multiple channels. One channel can be defined as an x-axis channel. A dataset is created for each selected channel.
To import multiple channels, choose File=>More File Functions=>Waterfall-Multi Channel Import. The following dialog box will be displayed:
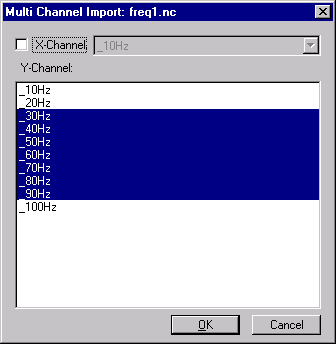
Select the channels to be imported. If necessary, you can specify one channel as a x-channel.
id-711882