Sequencer Tutorial
Within this tutorial, you will create a small demo project including several basic sequences. The tutorial will give an introduction on how to use the Sequencer and it shows the main concepts.
1. Workspace Switch
The Sequencer stores its sequences in a project folder called workspace. This is the center of a project where you should store all the belonging resource fies and documents. You will reach this folder e.g. here:
 press
press  to open the workspace in the file browser
mouse over the workspace name shows its location in the tooltip
The initial workspace after installation is located in the user directory. Lets see this tutorial as a small project, so we will create a new workspace for it:
press  to switch the current workspace
type a name for the new workspace like “TutorialWS”
press create and choose the location where to store the workspace folder
2. First Sequence
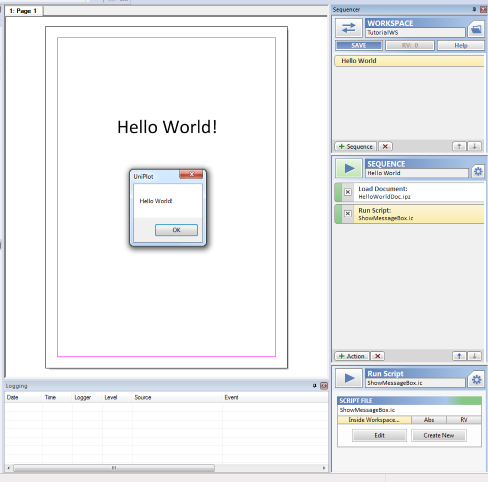
The first sequence shall display “Hello World” on a Document and open a Message Box.
press  to create the sequence, name it “Hello World”
Now we need to add the actions which will handle the document and the Message Box.
To get an overview about which action types are available so far, press  and
go mouse over the buttons of the popup. On the left you will get a brief discription of their functionality.
To handle the document there is a standard action “Load Document” and for the Message Box we will write one line of Script.
and
go mouse over the buttons of the popup. On the left you will get a brief discription of their functionality.
To handle the document there is a standard action “Load Document” and for the Message Box we will write one line of Script.
For the Document:
press and choose the type “Load Document”
There is no document file assigned yet to the action, therefore its red and cannot be executed. We wont load an existing document but create our own one, so:
press “Create New” in the action, name the document “HelloWorldDoc”
add a text object to the first page and label it “Hello World!
save the document (its stored in the workspace) and close it
For the Message Box:
press and choose the type “Run Script”
press “Create New” and name the script file “ShowMessageBox”
type the line
MessageBox("Hello World!")
save the script
That’s it, we can run the sequence by pressing the Play (sequence area) button.
You can run the actions separately by pressing the Play (action area) button or by double clicking the action in the sequence list.
save the sequence configurations inside the workspace by pressing 
3. Basic Data File Handling
To demonstrate the “Data Exchange” and the “Browse for file” action, we will create two demo data files:
create a new file “Data1.csv” in the workspace and enter:
Time, Torque
s, Nm
1, 50
2, 150
3, 120
Remember to access the workspace by pressing
create a second file “Data2.csv” in the workspace and enter:
Time, Torque
s, Nm
1, 110
2, 40
3, 60
load “Data1.csv” in the data browser
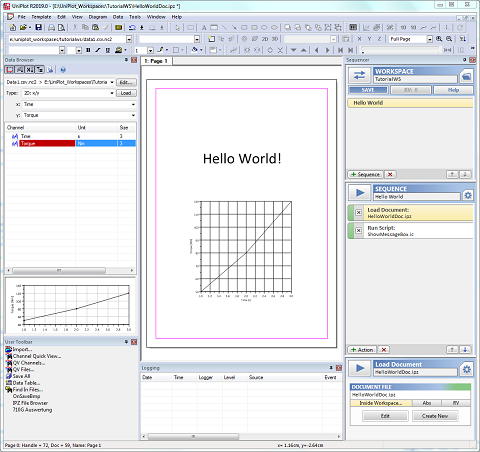
Now we want to create a 2D x/y Chart with this data in our document. After running a “Load Document” action, the document will be treated as a new document. This prevents to accidently override a template of a generated document. You see the difference of “Run” and “Edit” in the menu line of Uniplot. Lets edit our document:
select the “Load Document” action and press “Edit”
select “Time” as X channel and “Torque” as Y channel in the databrowser and “Load” the chart
save the document
This is how it should look like now:
Now we want to load the data during the sequence execution:
add an action “Data Exchange”
select “Data2.csv” from the workspace by pressing 
you can disable the script action now by pressing its checkbox in the sequence view
Running the sequence will load the document and exchange the data with your second data file.
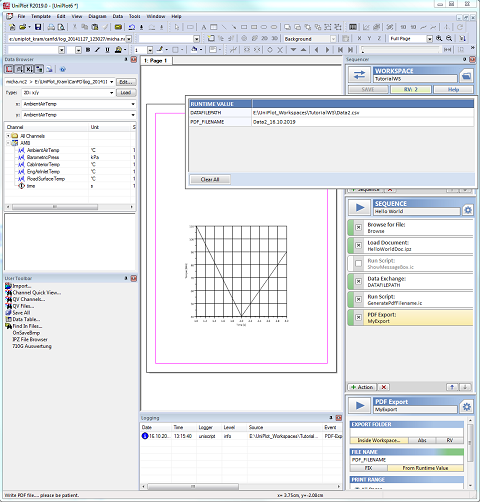
4. First Runtime Value
In the next step, we want to bring a little bit of user interaction into our sequence, the user should select the data file during sequence execution. This is the first moment we will use “Runtime Values”. They are used for basic data transfer among actions (like a path of a file).
add an action “Browse for file” to the sequence and move it at the top of the sequence using 
Have a look at the configuration of the action. You will see that it will write the path of the chosen file into the Runtime Value “DATAFILEPATH”:
run this single action by pressing Play (action area) and chose “Data2.csv”
The Runtime Value is set now, have a look at it by pressing  in the workspace area.
Now we want to use the value in our “Data Exchange” action. Therefore switch the file input of the action
from “inside Workspace” to “from Runtime Value”
in the workspace area.
Now we want to use the value in our “Data Exchange” action. Therefore switch the file input of the action
from “inside Workspace” to “from Runtime Value”  . The name “DATAFILEPATH” is predefined
to match here for both actions, but feel free to chose different names.
. The name “DATAFILEPATH” is predefined
to match here for both actions, but feel free to chose different names.
Run the sequence to see how both actions work together.
You can even extend the sequence by adding a “Set Runtime Values” action at the beginning of the sequence. Add a Runtime Value definition “DATAFILEPATH” to a data file you use as default file. By switching on/off the “Browse for file” action you can easily choose the way how to select the file.
5. PDF Export, further Usage of Runtime Values
Lets export the document as a PDF file. Thats easy:
add an action “PDF Export”
Press Run and you will get your PDF Document.
(in case you did not configured Ghostscript for your UniPlot so far, have a look here File=>PDF-Export)
Per default, the file name for the exported file is set to “Fix” (“MyFileName”). But let’s assume we want to define it dynamically, e.g. lets take the data file name and add the current date to it. So we will need a script to generate the name and pass this name to the “PDF Export” action. Again, we will use Runtime Values to do so, we can read and write Runtime Values from script via Seq_GetRuntimeValue and Seq_SetRuntimeValue:
add a “Run Script” action, press “Create” and name the script “GeneratePdfFilename”
move the action in front of the “PDF Export” action
press “Edit”, enter the following lines and save the script:
sDataFilePath = Seq_GetRuntimeValue("DATAFILEPATH")

sDataFileName = SplitPath(sDataFilePath)[3]
sDate = DT_Format(DT_GetCurrentTime(), "%x")
sPdfFileName = sDataFileName + "_" + sDate

Seq_SetRuntimeValue("PDF_FILENAME", sPdfFileName)
switch the file name definition in the “PDF Export” action to
Now you can run the whole sequence.
6. Trigger and control Sequences from external software
It’s a common use case that you want to to start your evaluation from external software like automation systems or database applications. And in most of the cases you need to pass some parameters like the path to the datafile or some flags to control the report generation.
Doing this is very easy using the Sequencer in UniPlot.
Simply create a batch file, pass the location of the workspace (/ws), the sequence name (/seq) and your parameters (/rv).
disable the “Browse for file” action, we will pass the path to our data in our batch file now
save your workspace pressing and close UniPlot
create a text file, copy the following line in it and save it as “MyCmd.bat”
C:\Uniplot\uniplot.exe /ws "D:\Projects\TutorialWS" /seq "Hello World" /rv "DATAFILEPATH = D:\Projects\TutorialWS\Data2.csv"
modify the path to your uniplot.exe if needed
modify the path to the workspace if needed
modify the path to the datafile if needed
save and close the batch file
Now you can double click the file. Uniplot will open and execute the evaluation using “Data2.csv”.
To complete the automated evaluation, we want UniPlot to close after exporting the PDF file. There is an action type prepared which executes such small functionalities that do not need to be configured, its called “Snippets”:
add a “Snippet” action at the end of the sequence and choose the functionality “Shutdown”
uncheck “Open PDF file” in the “PDF Export” action
Again, save the workspace and close UniPlot. Run the batch file, UniPlot is ready now for a completely automated evaluation.
7. Conditions
Beside the option that you can switch on and off an action with the checkbox in the sequence view, you can configure a condition to define if an action shut run or not dynamically depending on the content of a specific Runtime Value.
Lets add a second parameter to our batch file which controls if the PDF Export should be executed or not:
extend the /rv parameter in the batch file with the Runtime Value “DO_PDF_EXPORT”
/rv “DATAFILEPATH = D:ProjectsTutorialWSData2.csv, DO_PDF_EXPORT = 1”
press  on the “Export PDF” action
switch on “Run on Condition” and enter:
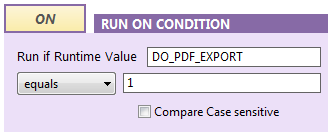
press “OK”
Notice that the background of the checkbox in the sequence view has become purple to signal that the action will not run in any case. Now you can switch the value of “DO_PDF_EXPORT” in the batch file to “0” or “1” to control the action execution.
8. Multiple execution of actions
Beside the condition, you can assign a second common feature to every action, the Multi Run or Loop feature. It will run the action multiple times, depending on the size of a list you define in a Runtime Value. Lets create two new sequences to see how this feature works:
press to create a sequence, name it “Start Sequence”
press to create a sequence, name it “Looped Sequence”
in the “Start Sequence”, add an action “Set Runtime Value”
add a Runtime Value “PATH_LIST” and set its value to
C:\MyFile1.txt, C:\MyFile2.txt, C:\MyFile3.txt
in the “Start Sequence”, add an action “Run Sequence” and select the here “Looped Sequence”
press on the “Run Sequence” action
switch on “Multi Run” and enter:
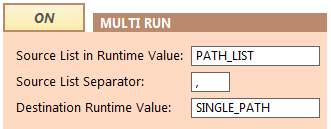
press “OK”
press  to jump into the sub sequence
add a “Run Script” action in the “Looped Sequence”, edit and enter:
sPath = Seq_GetRuntimeValue("SINGLE_PATH")

sMessage = "In this Loop of the Sub Sequence, you can use \n"
sMessage = sMessage + "SINGLE_PATH with its value \"" + sPath + "\"!"

MessageBox(sMessage)
save the script
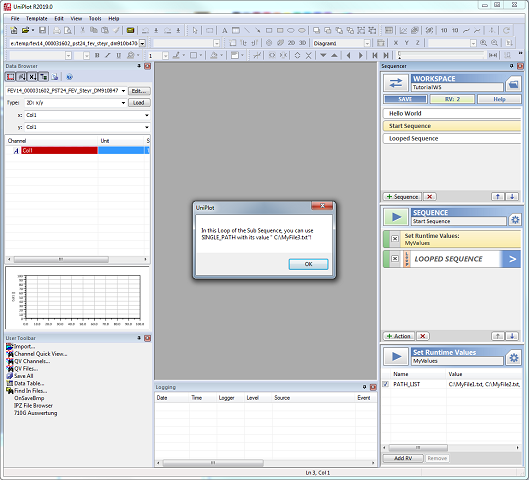
Now you can run the sequence “Start Sequence”. You will see that the subsequence is called for every entry of the list in the Runtime Value “PATH_LIST”.
You can use this feature e.g. to define multiple source files in a batch file and run the evaluation for each file in a row.
9. Conclusion
Congratulations, you created your first workspace and your first set of sequences inside!
So get ready to start your own projects using the Sequencer, we are sure you will appreciate the new way of structuring your evaluations. Especially the easy way of switching between projects and the opportunity of running only parts of the evaluation with one click can help you a lot.
And feel free to send us general feedback or proposals for new action types and snippets. Depending on this we will further work on this feature.
id-1074338